Tuesday, April 29, 2008

Amaleen Gonzalez - Area and Perimeter of Triangles, Parallelograms, and Rhombuses

Amaleen Gonzalez
Math B
Area and Perimeter of Triangles, Parallelograms, and Rhombuses

A triangle is a polygon with three sides and three angles. A parallelogram is a quadrilateral with two sets of parallel sides, the opposite sides being of equal length and the opposite angles congruent. A rhombus is a four-sided polygon where every side has the same length. A rhombus can also be defined as an equilateral quadrilateral. Area is the amount of space, or the two-dimensional size, taken by a figure or object. Perimeter is the distance around a shape, or figure.


Triangles

To find the area of a triangle, you must multiply the base by the height and then the quotient by a half.

For an acute triangle, the base can be any side of the triangle. The height is a line drawn from the base to the opposite point, or corner, of the base. An equation you can use can be Area = 1/2bh . The variable would represent the base and the variable would represent the height.


For a right triangle, the height is the line opposite of the hypotenuse.


For an obtuse angle, dotted lines are drawn to make it look like a right triangle. However, only the line opposite of the hypotenuse is used. This line is used to find the height. The base’s measurement remains the same.


examples:


1.


2.


3.


To find the perimeter of a triangle, you simply have to add up the length of each side together. A formula you could use to find the perimeter of a triangle could be Perimeter = a+b+c , where each variable represents a different side of the triangle.


example:


Parallelograms


To find the area of a parallelogram, you must multiply the base by the height. The base can be any side of the parallelogram and the height is found by drawing a dotted line.


The formula for finding the area of a parallelogram is A = b x h. b being the base and h being the height.


example:


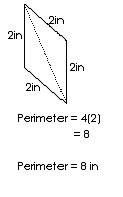
To find the perimeter of a parallelogram, all you have to do is add up the length of its sides. A parallelogram has two sets of parallel sides. Knowing this, you could use the formula Perimeter = 2a + 2b . The variable a would represent the length of one of its shorter sides, and b would represent the length of one of its longer sides.


example:


Rhombi

To find the area of a rhombus, you must first multiply the lengths of the diagonals. Then you must divide the product by two. A diagonal is a line drawn from one point, or corner, to the point opposite of it.
A formula you could use to find the area of a rhombus is 1/2xy. The variable would represent the length of one diagonal and the variable would represent the length of the other diagonal.

example:
Each side of a rhombus is equal. To find the perimeter of a rhombus, adding each side is optional. But to make it easier, you can multiply the length of one side, since it is the same as the others, by four.

example:

Practice Problems

Find the area of the following

1.
2.
3.
4.
5.

Find the perimeter of the following
6.

7.
8.

Cashel & Rosalba - different types of triangles


Cashel Payne, Rosalba Urena 4/28/08
Math B
Bronx Prep
Different Types of Triangles

There are many different types of triangles. They all do not equal the same value or have the same form. However, all triangles have three sides. You can identify a type of triangle by its sides. An isosceles triangle has two sides that are same length and one side that is a different length. A scalene triangle has all three sides’ different lengths. Equilateral triangles all have the same length on all three sides. Obtuse triangles have angles that are more than 90 degrees. Acute triangles have an angle that is less than 90 degrees. A right triangle has an angle that is 90 degrees.


Examples: types of triangles

1) Right triangle


2) Equilateral triangle


3) Obtuse triangle
CHECK EMAIL


4) Isosceles
CHECK EMAIL

Practice Problems:

Directions: Identify what type of triangle it is for the following.

1. Side 1 – 11 cm
Side 2 – 11 cm
Side 3 – 11 cm

2. Side 1 – 21 cm
Side 2 – 5 cm
Side 3 – 3 cm

3. Side 1 – 16 cm
Side 2 – 3 cm
Side 3 – 16 cm

4. CHECK YOUR EMAIL FOR TRIANGLES IMAGES

5. CHECK YOUR EMAIL FOR TRIANGLES IMAGES
6. CHECK YOUR EMAIL FOR TRIANGLES IMAGES
7. Side 1 – 130 cm
Side 2 – 20 cm
Side 3 – 30 cm

8. CHECK YOUR EMAIL FOR TRIANGLES IMAGES


In conclusion all triangles might not be the same length or size but they all have 3 sides. To be a triangle, one must have right angels, acute angles, or obtuse angles. Out of these angles, at least 2 angles are needed to make 1 triangle. Some angles are the same length and some aren’t, depending on what type of triangles you are defining.

Monday, April 21, 2008

4th Quarter Geometry Project

Over the break each of you wrote in your journal about the topic you were assigned. Your journal entry should contain the following: introductory paragraph (introducing your topic), 4 examples that you solved, 8 problems that you didn't solve, and a conclusion. I'll be checking your journal when I get back to make sure it is complete.


On Monday, April 28, and Tuesday, April 29th, you will be in the computer lab working in your groups (except Melanie and Amaleen, who will be working individually). The groups are listed below:


1. Area and perimeter of circles, squares, and rectangles (Melanie)
2. Area and perimeter of triangles, parallelograms, and rhombuses (Amaleen)
3. Similar Triangles (Dionelis and Hayley)
4. Different types of triangles (isosceles, equilateral, scalene, obtuse, acute, and right) (Rosalba and Cashel)
5. Angle bisector and midpoint (Trevion, Marcus, and Jamej)
6. Adjacent and vertical angles (Xavier and Brandon)
7. Supplementary and complimentary angles (Oliver and Stephanie)
8. Parallel lines and the angles formed by the transversal (How do you know when two lines are parallel? Be sure to also discuss what the transversal is.) (Diamond and Abenai)

Directions for Monday:

1. Sit next to your group members
2. Look at each other's work that you did over the break
3. Write in Microsoft Word a final draft which should contain the following: introductory paragraph (introducing your topic), 4 examples that you all have solved, 8 problems that you haven't solved, and a conclusion.
IMPORTANT: You are creating ONE DOCUMENT as a group, and this document should include work from each partner and/or new work that you all created together!!!
4. Save the document in a place where you can easily locate it or e-mail it to yourself.

Directions for Tuesday:


Today you will make the final revisions to the work you did on Monday. Print out a copy of the final draft (making sure all of your names are on it) because you will have to hand it into me on Wednesday. When you are done making the final revisions and have printed it out, you will then post your work onto the blog. To get into the blog you must got to http://www.blogger.com/start and enter your username and password. Only one person from the group needs to log in, meaning you only have to post your work one time under one person's name.


If you want to post an equation that you made in Equation Editor, a diagram, or a table, follow the following instructions:

1. Create the equation, diagram, or table in Microsoft Word
2. Open Microsoft Paint
3. Copy the equation, diagram, or table from Word to Paint
4. Adjust the size of the canvas in Paint by manually dragging the edges of the canvas or by going to Image at the top of the screen then selecting Attributes
5. Save the image you have created
6. Insert the image into the blog (see below) - after you insert the image, you might have to manually drag it to the place where you want it


You will be graded on three products:

1. Your journal entry
2. Your word document (make sure you print it out so you can hand it into me on Wednesday)
3. Your blog posting

Good luck, and I'll see you all on Wednesday.

Mr. Glogower